Surya Namaskar or sun greeting or a technique of solar vitalisation is a well-known and vital technique within the yogic repertoire.
Surya means sun and Namaskar means greeting or salutation. In ancient times the sun was looked upon as a symbol of consciousness.
Surya Namaskar’s versatility and application make it one of the most useful methods to have a healthy, vigorous, active life and at the same time prepare for an inner awakening. It is almost a complete process in itself, that comprises asanas or postures, pranayama or breathing techniques and meditation.
For most of us, today’s lifestyle accentuates mental tensions, worries and many other problems such as, relationships, economics, geopolitical threat due to war and destruction. At the same time a sedentary life style is increasing due to increase in technology and labour-saving devices. This increases mental and physical ill health. We need an antidote to this.
Yoga is an ideal antidote and a powerful therapy for mental and physical diseases. Surya Namaskar is an integral part of the yogic approach to this problem and can be easily integrated into our daily lives as it requires only 5 to 15 minutes of practise daily to obtain beneficial results.
It is more than just a sequence of physical exercises. It stretches, massages, tones and stimulates all the muscles, vital organs by alternatively flexing the body backwards and forwards.
The 12 postures in the sequence create the physical matrix around which the form of practice is woven. These postures generate prana, the subtle energy that activates the psychic body. Surya Namaskar awakens the solar aspect of an individual’s nature and releases this vital energy for the development of higher awareness.
The alternating backward and forward bending postures flex and stretch the spinal column and limbs through their maximum range. The series gives such a profound stretch to the whole body that few other forms of exercise can be compared to it.
Most beginners will discover stiffness in their bodies from muscular tensions, tightness in the tendons, and toxic deposits in the joints. Stiffness, lack of co-ordination and a tendency to strain can all be overcome through practicing very slowly, with an emphasis on awareness and relaxation in each posture. Regular practice of Surya Namaskar is one of the most rapid methods of obtaining a supple body.
The practice should be mastered by first becoming familiar with postures individually and then as a whole. Synchronising the breathing with the movements is the next step. The basic breathing principle followed is inhalation during the backward bending postures due to expansion of the chest and exhalation with forward bending postures due to compression of the chest and abdomen.
How many rounds of Surya Namaskar should one do?
There are no such set rules. However, it should never be continued till the point of exhaustion. Practitioners should be aware of their physical condition and limitations to avoid strain to the muscles. Surya Namaskar is a powerful practice, which if overdone can lead to unpleasant pain and aches. Beginners can start with 2 to 3 rounds and then slowly increase the number of rounds. Advanced student can practise up to 54 rounds.
When and where to practise?
The ideal time to practise is in the morning at the time of sunrise. At this time the atmosphere is filled with the sun’s rays, which are important to the body. If the morning time is not convenient then it can be practiced at any convenient time during the day. It is also ideal to face the sun while you practise.
Surya Namaskar leads to flexibility, endurance and efficient use of muscles. Not only do the muscle groups coordinate with each other, but it also coordinates within the structure of the muscle itself, leading to greater strength. Holding each posture allows the muscles and tendons time to stretch a little more. Once the tendons have been stretched, they will remain that way and maintain a great degree of suppleness in the body.
What are the limitations?
There are no limitations as far as age is concerned. However, elderly people are advised to avoid over exertion and children under eight years of age usually do not need to do Surya Namaskar. People with high blood pressure, and coronary heart disease should consult their doctor. Also people with spinal problems should consult the doctor. Although many spinal problems can be alleviated through this practice, a person with slip disc should avoid this practice.
The most important point to keep in mind is not to strain. Surya Namaskar teaches us to tune into our own capabilities and limitations. With time and practice, you will find these limitations receding.
Surya Namaskar sequence of postures:
Each round consists of two sets. These 12 yoga poses complete one set of Surya Namaskar. To complete the second half, you need to repeat the same sequence of postures, only moving the left leg instead of the right (in steps 4 and 9 given below). You might find several versions of doing Sun Salutation. However, it is best to stick to one particular sequence and practice it regularly.
Step 1 – Pranamasana (Salutation)
Stand at the edge of your mat, keep your feet together and balance your weight equally on both the feet.
Expand your chest and relax your shoulders.
As you breathe in, lift both arms up from the sides and as you exhale, bring your palms together in front of the chest.
Step 2 - Hastauttanasana (Raised Arms Pose)
Breathing in, lift the arms up and back, keeping the biceps close to the ears. In this pose, the effort is to stretch the whole body up from the heels to the tips of the fingers
How to deepen this yoga stretch?
You may push the pelvis forward a little bit. Ensure you’re reaching up with the fingers rather than trying to bend backwards.
Step 3 - Hasta Padasana (Hand to Foot Pose)
Breathing out, bend forward from the waist, keeping the spine erect. As you exhale completely, bring the hands down to the floor, beside the feet.
How to deepen this yoga stretch?
You may bend the knees, if necessary, to bring the palms down to the floor. Now make a gentle effort to straighten the knees.
It’s a good idea to keep the hands fixed in this position and not move them henceforth until we finish the sequence.
Step 4 - Ashwa Sanchalanasana (Equestrian Pose)
Breathing in, push your right leg back, as far back as possible. Bring the right knee to the floor and look up.
How to deepen this yoga stretch?
Ensure that the left foot is exactly in between the palms.
Step 5 – Dandasana (Stick Pose)
As you breathe in, take the left leg back and bring the whole body in a straight line.
How to deepen this yoga stretch?
Keep your arms perpendicular to the floor.
Step 6 - Ashtanga Namaskara (Eight Point Salutation)
Gently bring your knees down to the floor and exhale. Take the hips back slightly, slide forward, rest your chest and chin on the floor. Raise your bottom a little bit.
The two hands, two feet, two knees, chest and chin (eight parts of the body touch the floor).
Step 7 – Bhujangasana (Cobra Pose)
Slide forward and raise the chest up into the Cobra posture. You may keep your elbows bent in this pose, the shoulders away from the ears. Look up.
How to deepen this yoga stretch?
As you inhale, make a gentle effort to push the chest forward; as you exhale, make a gentle effort to push the navel down. Tuck the toes under. Ensure you’re stretching just as much as you can; do not force.
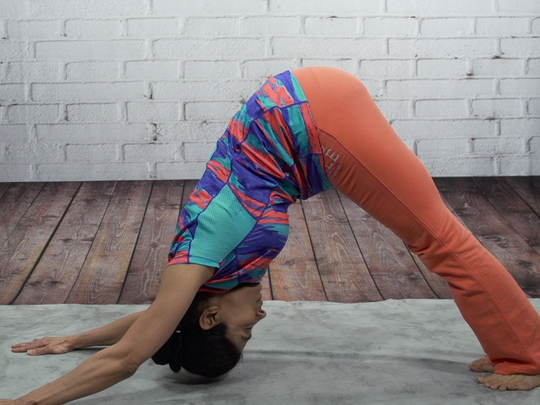
Step 8 – Parvatasana (Mountain Pose)
Breathing out, lift the hips and the tail bone up, chest downwards in an ‘inverted V’ (/\) posture.
How to deepen this yoga stretch?
If possible, try and keep the heels on the ground and make a gentle effort to lift the tailbone up, going deeper into the stretch.
Step 9 – Ashwa Sanchalanasana (Equestrian Pose)
Breathing in, bring the right foot forward in between the two hands, left knee down to the floor, press the hips down and look up.
How to deepen this yoga stretch?
Place the right foot exactly between the two hands and the right calf perpendicular to the floor. In this position, make a gentle effort to push the hips down towards the floor, to deepen the stretch.
Step 10 – Hasta Padasana (Hand to Foot Pose)
Breathing out, bring the left foot forward. Keep the palms on the floor. You may bend the knees, if necessary.
How to deepen this yoga stretch?
Gently straighten the knees and if you can, try and touch your nose to the knees. Keep breathing.
Step 11 – Hastauttanasana (Raised Arms Pose)
Breathing in, roll the spine up, hands go up and bend backwards a little bit, pushing the hips slightly outward.
How to deepen this yoga stretch?
Ensure that your biceps are beside your ears. The idea is to stretch up more rather than stretching backwards.
Step 12 – Tadasana
As you exhale, first straighten the body, then bring the arms down. Relax in this position, observe the sensations in your body.
Sequence poses information courtesy: www.artofliving.org
Editor’s Note: The blogger is a homeopath, lifelong vegetarian and high level yoga practitioner. If you have any questions for her, please email them to readers@gulfnews.com or post on the Gulf News Facebook page.