Recipes courtesy of Jade Sanducas, Resort Cake Artist/Pastry Chef de Cuisine, Madinat Jumeirah, Dubai and and Chamara Dinesh, Junior Sous Chef, Madinat Jumeirah, Dubai
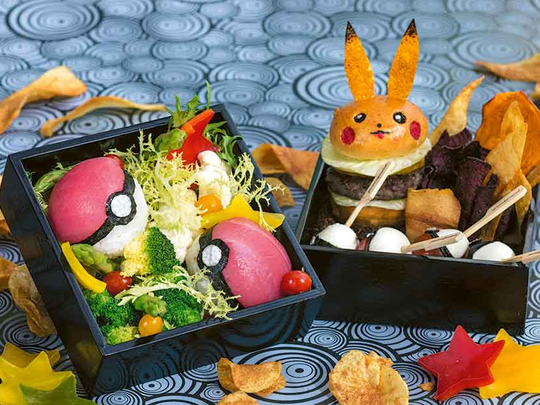
PIKACHU BEEF BURGER
Serves 4 | Cooking time: 2.5 hrs
For the burger buns
Ingredients
● 50ml milk
● 30ml water
● 1 tbsp unsalted butter, softened
● 250g all-purpose flour
● 1 tsp yeast
● 1 tsp sugar
● 1/4 tsp salt
● 1 egg
● Burger buns
Method
1. Preheat the oven to 200°C.
2. Heat milk, water and butter until warm in a small pan.
3. Mix 200g flour, yeast, sugar and salt in a large bowl. Mix the milk mixture into the flour mixture before mixing in the egg.
4. Stir in the remaining flour, beating well for 5 minutes.
5. When the dough has formed, knead until smooth and elastic, about 10 minutes.
6. Divide the dough into 4 equal pieces, shape into smooth balls and place on a greased baking sheet. Cover and let it rise for 45-60 minutes.
7. Bake them for 10 minutes. Apply egg wash on the surface and bake for another 5 minutes. Leave aside to cool down.
For the beef patty
Ingredients
● 200g minced beef
● 1 tbsp breadcrumbs
● 2 tsp chopped onion
● 2 tsp chopped carrot
● 2 tsp chopped celery
● 1 egg
Method
1. Mix all the ingredients. Season.
2. Divide the mix into 20 portions and flatten each into round shapes.
3. Grill both sides for 3-4 mins.
For the Quinoa crackers
Serves 4 | Cooking time: 45 mins | Difficulty: Medium
Ingredients
● 150g quinoa flour
● 1/2 tsp salt
● 1 tbsp coconut or olive oil
● 100ml warm water
Method
1. Preheat the oven to 170°C. Set out a large baking sheet.
2. Spread a silicone baking mat on a level surface and lightly sprinkle with quinoa flour.
3. In a bowl, whisk the quinoa flour and a little salt. Make a well in the centre and add in the oil and warm water and mix.
4. Place the dough on the silicone mat. Lightly dust a rolling pin with quinoa flour and roll out the dough to 2mm thickness. Cut the dough into an ear shape. Sprinkle the remaining salt on top and gently press it into the dough. Transfer the silicone mat to the baking sheet.
5. Bake for 30-35 minutes until crunchy. Cool to room temperature on the baking mat. Transfer to an airtight container.
For the potato crisps
Serves 4 | Cooking time: 1 hr | Difficulty: Easy
Ingredients
● 1 local potato
● 1 purple potato
● 50g flour
● 300ml frying oil
● 50g salt
Method
1. Slice potatoes into 2mm-thin slices. Soak in salted cold water for 40 minutes. Drain, then rinse and drain again. Dust with flour.
2. Heat the oil in a fryer to 180°C.
3. Fry potato slices in small batches. On turning golden in colour, remove and place on paper towels.
4. Sprinkle salt over fried chips.
Assembly
Ingredients
● Lettuce leaves
● Tomato slices
● Cheddar cheese slices
To assemble
1. Cut the burger bun into slices and toast under the grill. Sandwich the patty between the bun, top with lettuce, tomato or cheddar cheese.
2. Insert the ear-shaped chips into the bun. Toast in the oven.
TUNA SUSHI POKE BALLS (SUSHI RICE BALLS)
Serves 2 | Cooking time: 1 hr 20 mins
Ingredients
● 100g cooked sushi rice
● 60g 1mm-thin, round slice
of yellow fin tuna
● 1 nori sheet
● 1 radish, thinly sliced
Method
1. Tear two sheets of cling film and place flat on the worktop.
2. Make a sushi rice ball, transfer to the centre of the sheet. Place the tuna on top and pull corners of the cling film together so you have a sphere. Twist excess cling film on top with one hand while shaping the ball with the other. Gently squeeze out trapped air. Unwrap the film.
3. Cut the nori into a strip 2X80mm. Place between the rice and tuna, tighten to form a belt. Cut radish into a 3mm round and place as the belt buckle.
For the garnish
Ingredients
● 100g each red, yellow and green peppers
● 2 pieces asparagus
● 100g broccoli
● 100g cauliflower
● 50g lettuce
Method
1. Halve and deseed peppers. Use a star cutter to make tiny stars.
2. Blanch the asparagus, broccoli and cauliflower. Cut broccoli and cauliflower into small florets.
3. Place the lettuce at the bottom of the lunch box, then the poké balls on top. Add boiled vegetables as desired.
CHOCOLATE CHIP COOKIES
15 portions | Prep and cooking time: 1 hr
Ingredients
● 100g bread flour
● 60g cake flour
● 25g hazelnut powder
● 1/2 tsp salt
● 100g butter
● 90g caster sugar
● 90g brown sugar
● 1 egg
● 1/2 tsp vanilla essence
● 180g dark chocolate chips
● 90g walnuts
Method
1. Preheat the oven to 180°C. Line the baking tray with baking paper.
2. In a bowl, whisk bread flour, cake flour, hazelnut powder and salt together. Set aside.
3. In the bowl of an electric mixer with the paddle attachment, slowly cream together the butter, caster sugar and brown sugar until smooth. Beat in the egg, then stir in the vanilla, flour mixture, dark chocolate chips and walnuts.
5. Drop by large spoonful on your lined baking tray.
6. Bake for 20 minutes.
VANILLA CUPCAKES
Makes 10 | Preparation and cooking time: 30 minutes
Ingredients
● 150g flour
● 1/4 tsp baking powder
● 100g butter
● 100g sugar
● 4 whole eggs
● 20ml milk
Method
1. Preheat the oven to 170°C. Line a cupcake/muffin pan with cupcake liners.
2. In a medium bowl, whisk together flour and baking powder. Set aside.
3. In the bowl of an electric mixer, cream butter and sugar with the whisk attachment on medium speed, gradually adding the eggs.
4. Reduce mixer speed to low and add the milk. Beat until just combined and smooth, scraping down the sides. The batter should be nice and thin.
5. Pour into the lined pan. Fill until three-fourths full.
6. Bake for 20 minutes. Let cool in the pan for a couple of minutes before removing.
ROLLED FONDANT FOR POKÉMON
Makes 1kg of fondant | Total prep time: 20 minutes | Leave overnight to set
Ingredients
● 60ml cold water
● 1 tbsp unflavoured gelatin
● 120ml light corn syrup
● 1 tbsp glycerine
● 1 tbsp clear flavouring
● 1kg powdered sugar
● Edible colours, as desired
● Corn starch, for dusting
Method
1. Place the cold water in a small microwave-safe bowl and sprinkle the gelatin on top. Let the gelatin set and soften for two minutes. Once set, microwave the gelatin for 15 seconds until it liquefies, but do not let it boil.
2. Stir in corn syrup, glycerine and desired flavourings. Microwave for 15 seconds more. Stir again until the mixture is smooth and clear.
3. Place the powdered sugar in the bowl of a large stand mixer fitted with the paddle attachment and make a well in the centre.
4. Pour the melted gelatin mixture over the corn syrup into the well.
5. Mix at low speed until the liquid is incorporated. Scrape down the sides of the bowl so all the sugar is incorporated. Remove from the mixer.
6. Dust the table with powdered sugar or corn flour and knead the fondant dough to completely incorporate everything. Wrap tightly in cling wrap and let it sit overnight. Next day, you can add edible colours of your choice to the dough.
7. To make the Pokémon characters, colour white fondant accordingly.
8. Dust your work surface with corn starch. Knead fondant to 3mm thickness to lay on top of cookies or cupcakes and cut to desired shape and size.
9. Mount the fondant using a cold glaze or substitute and smooth with fingers so it attaches on all corners.
10. For the characters, get creative using a round cutter and a sharp knife (such as X-acto) to shape your desired Pokémon. Use a little water to glue the fondant pieces together.
RED POKE BALLS FILLED WITH SMARTIES
Makes 2 balls | Preparation and cooking time: 2.5 hours
Ingredients
● 100g tempered chocolate
● Fondant
● Cold glaze
● Smarties, as required
Method
1. Pour tempered chocolate onto the a round mould. Let it set for 2 minutes. Flip the mold and remove the excess chocolate.
2. Scrape the inside excess chocolate and let it set either at room temperature (1 hour) or in a chiller (10 minutes).
3. Lightly tap the mould to be removed from shell once chilled.
4. In order for the ball to have a flat-bottomed surface, put a plain baking tray in the oven and heat up for 3 minutes. Level the sphere with the tray by placing the chocolate until it melts to a flat bottom.
5. Dust table with icing sugar. Knead white fondant and cut into circles to cover each side of the Pokémon ball. Use red fondant and white fondant and cover the sides of the ball. Cover chocolate in cold glaze before sticking the fondant on top.
6. Knead red and black fondant to make small belt.
7. Insert smarties into the ball. Seal with a little water. Place the belt around the ball. Finish with a tiny circle of white fondant if desired.
HOW TO MAKE A 3D PIKACHU
Ingredients and Materials
● Fondant coloured to yellow, black and red
● Gum text or CMC powder, if desired
● Small skewer
● Toothpicks
● Cold glaze or water
● X-acto knife
● Small cutter
Method
1. Make the yellow fondant and add CMC powder into it, if using. Tthe powder is used as a stabiliser and makes the fondant dry faster.
2. Roll the yellow fondant into an oval shaped size, shaping the body first. Once you’re satisfied with the shape, insert a small skewer.
3. Next, make the head of the Pikachu by shaping fondant into an oval and squeezing the sides to shape cheeks. Set aside to let it dry. Attach onto the body once dry with a toothpick.
4. Form the ears by rolling the fondat into long triangles and attach black fondant to the tips.
5. Use glaze or water to seal the features in place.
6. Use the X-acto or other sharp knife to shape the mouth and make a W cut. Insert a piece of small red fondant for the tongue cut into a u sized shape.
7. For the eyes, roll black fondant in your hands and press it onto the head. Add white to the eyes and a small nose using the same technique.
8. To make the tail, cut a zigzag shape and let the fondant dry. Attach once it’s fully set.
Note: Always make sure that your work station is dusted well with powdered sugar or corn flour. Unused fondant can be wrapped tightly in cling-wrap and stored at room temperature for several weeks. Knead well before using.